Support This Work
DOWNLOAD FROM THE BELOW LINK
USE AT YOUR OWN RISK
Please only share as a link to www.WORKWEBS.com and specify checking the Event Cue tab.
I opened a thread on the REAPER forum for discussion. Click here for that thread.
Cue Manager and Status Sharing Communicator using REAPER as the Web Control - an Introduction
Please only share as a link to www.WORKWEBS.com and specify checking the Cue tab.
What's on this page: A link to the Cue Management and Communication scripts that can be used to share and communicate status information live. It could even be used to implement a teleprompter for one or more recipients.
Note: Contact WorkWebs using the Contact Form to inquire about branded solution options as well as hosted solutions with low daily rates.
Details
USE AT YOUR OWN RISK
Please only share as a link to www.WORKWEBS.com and specify checking the Cue tab.
What's on this page: A link to the Cue Management and Communication scripts that can be used to share and communicate status information live. This can be used in Theater, Theatre, Project Management, Event Management, Wedding or Worship flow management, live status broadcasts to employees or venues, sport event team alerts, communications to teams in tournaments advising them of tournament progress and next teams to play via the internet, sharing any status or event information, anything where communication of steps and their completion is useful. It could also be used to implement a teleprompter for one or more recipients by presenting prepared information in a sequential manner or even in a non-sequential manner..
Since it communicates Live and allows a master user to update the Cues on the fly dynamically if needed, it is a powerful commutations tool to keep multiple people on track in any event situation.
It uses REAPER Web Scripts to provide control, using JavaScript coding. This eliminates the need to install a Web Server.
You can use this on an intranet or the Internet if you open up access (Internet access is enabled through DDNS, static IP and DNS, Dynu or another service, and router NAT table updates for ports).
You can include HTML in Cue content to display images or links to Google Docs or Web Pages within the cue display!!
--If you need to see a live demo where you can open the various views from home or the office to work with a sample project, email me at the contact link and I may be able to help--
REAPER Web scripts contain security credential options, but they are HTTP and not HTTPS. If you need more significant security, install a router of your own and only share access to the desired devices.
IF YOU open it up on the Internet, it can be used to share event live status with people who are not at the event...such as to alert parents that it is getting close to time pick up their kids, or that a practice or event has completed.
With multiple PCs and setups, you can run internal and external instances.
The scripts also come in 3 flavors:
- View Only,
- View and Navigate Prior/Next, or
- Full control to jump to any cue at any time.
By using REAPER, the software will cost $60 after a 60 day free trial (based on information at the time of this original writing). This is a great price for a great product. REAPER download link. This tool will run on a Web browser, and has been tested back to first generation Apple iPad through 2018 versions of Android Cell Phones and Windows devices.
OVERVIEW OF THE TOOLS AND THEIR USE
There are three tools:
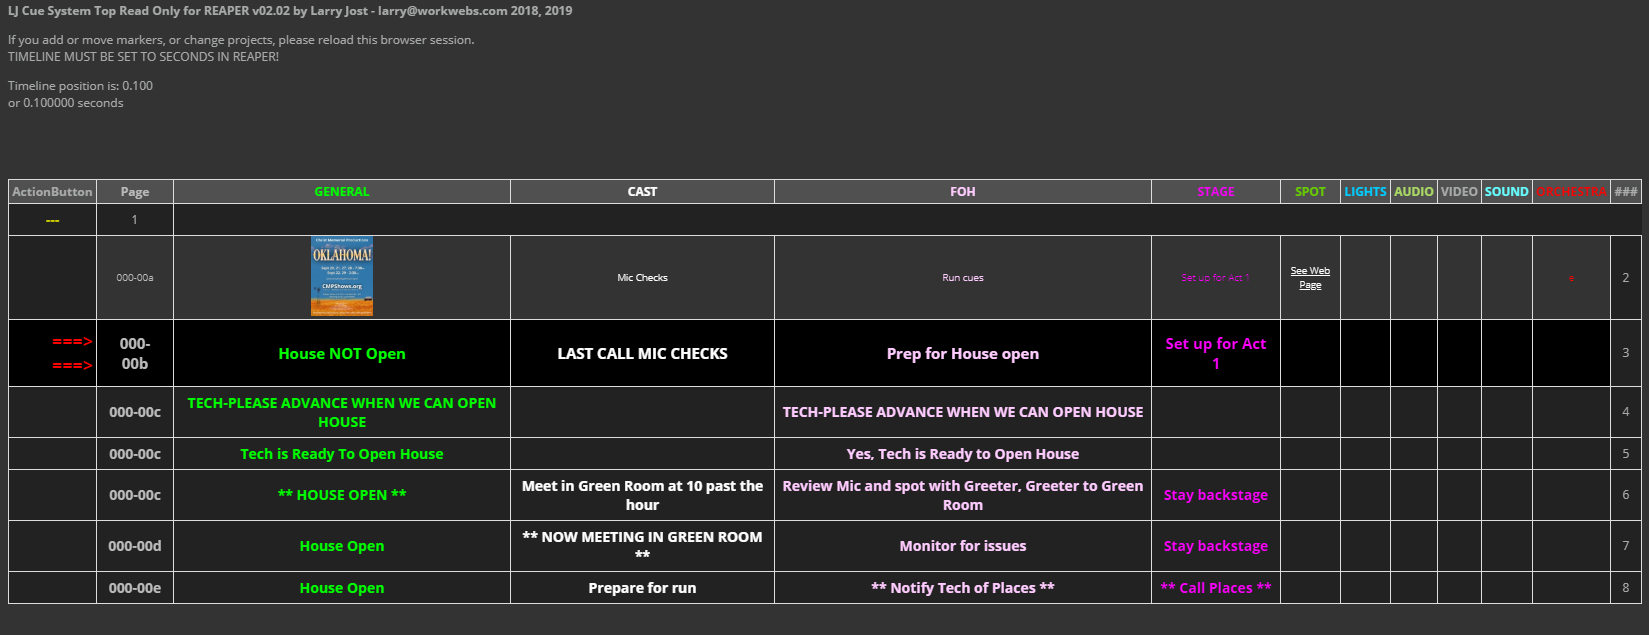
- LJ Cue System Top Read Only for REAPER
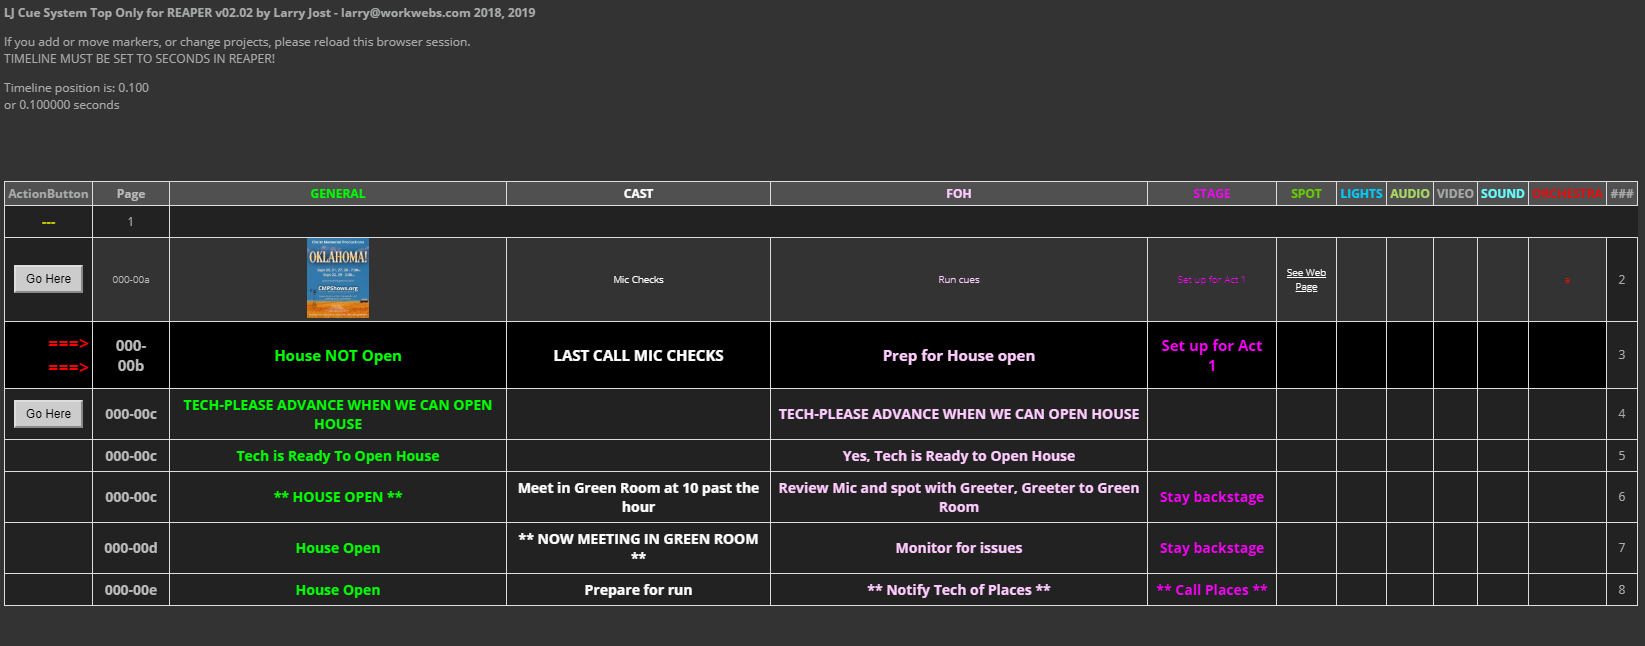
- LJ Cue System Top Only for REAPER
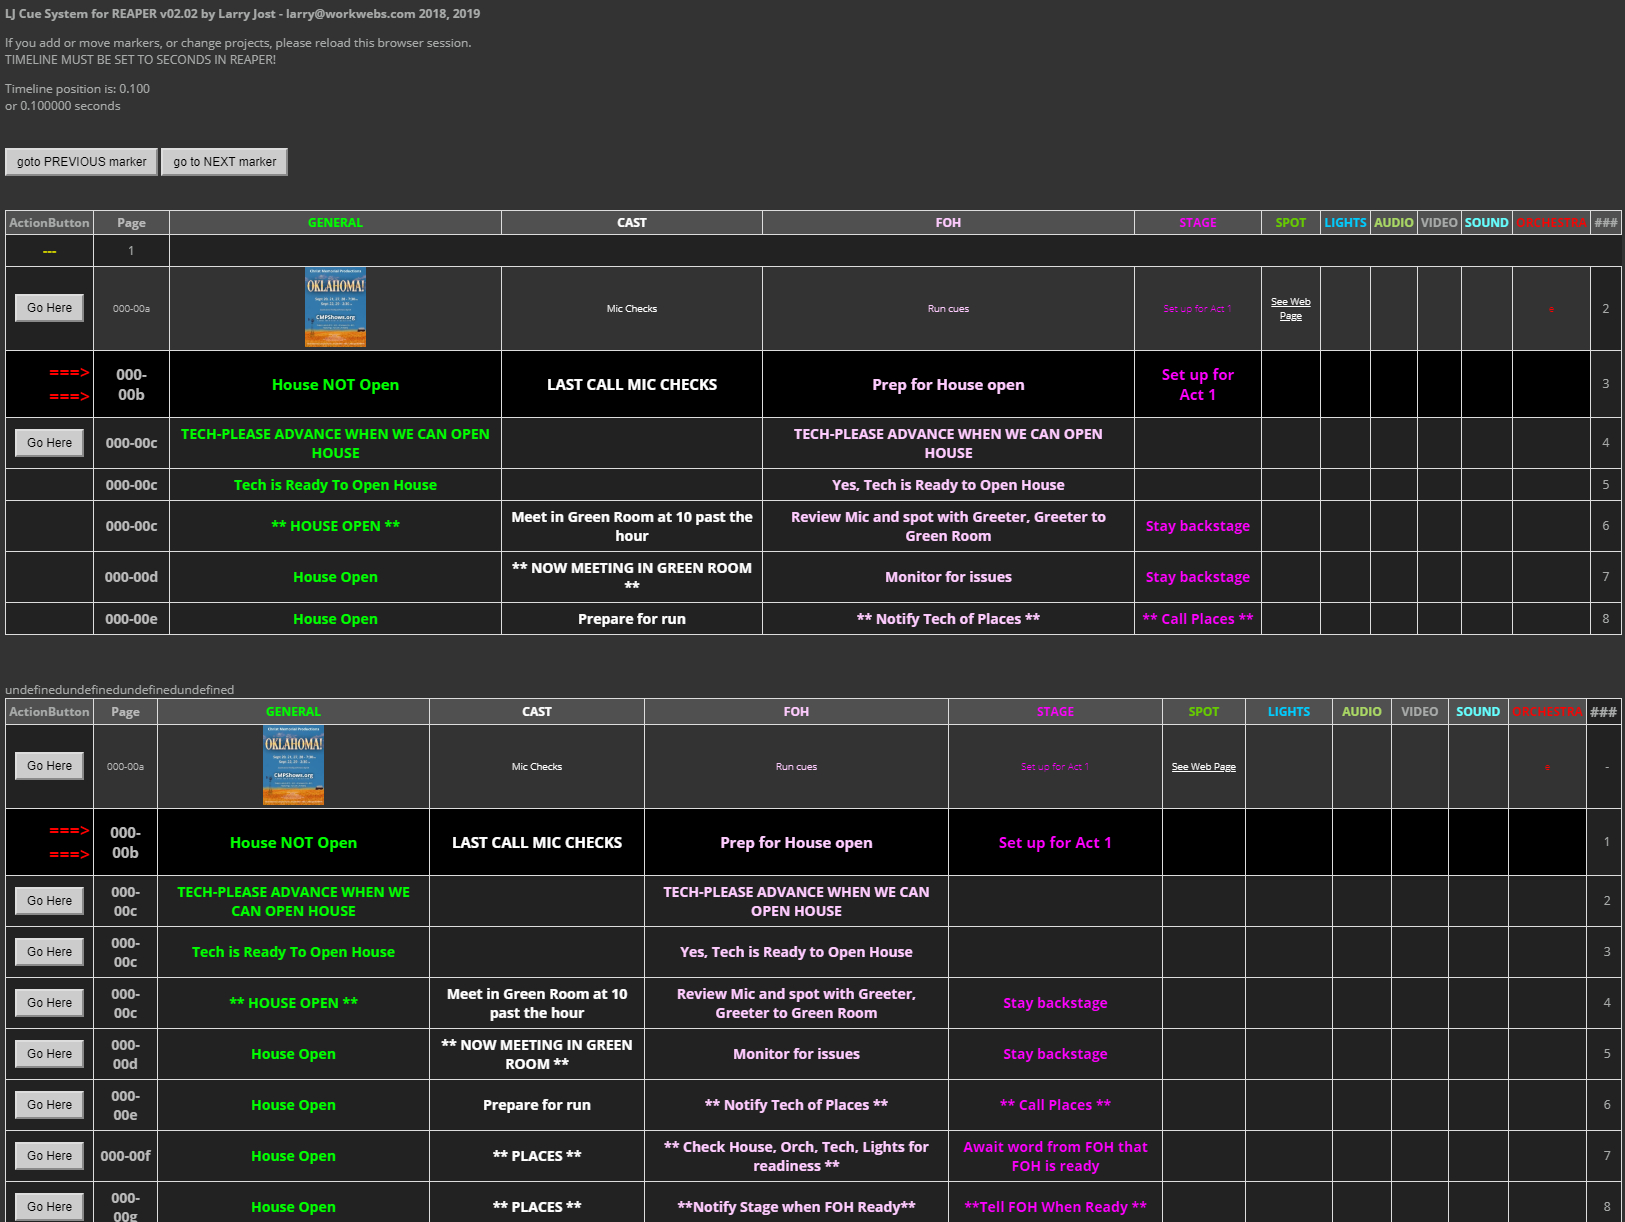
- LJ Cue System for REAPER
- The first is Read Only - to display the current Cue and a few prior and next Cues so people can track event status.
- The second allows the user to single step back and forward from the current position. This can only go to trusted people, but is good to allow others to Respond to a Cue to communicate the completion of a step of action.
- The third includes the above but allows viewing of and jumping to any cue at any time. This would be for the event manager or stage manager or whoever is running an event.
Since this is using REAPER, and it uses REAPER Markers and timeline for navigation, it can be used to control muting and unmuting of microphones when used with an audio interface on or linked to the computer that is running REAPER. The other REAPER tools listed on this site for Theater Control can also be used in conjunction with this tool, as can other third party REAPER scripts. HOWEVER, the system runs just fine without controlling any audio details.
By including HTML in Cues you can even establish links to outside materials, display images, or do anything else HTML allows...which is quite a lot!
TOOLS and TEMPLATES INCLUDED
Here's what's in the downloadable ZIP file:
Sample Cue File (in Excel)
Three "scripts" to install under REAPER, one for each tool.
How it Works
Here's how it works.
First, create a Cue Table. Here I used Excel. A sample is included in the download.
The final export is a Comma delimited (CSV) export from Excel.
While the final table is a bit ugly, the included sample has formulas in place to generate the final tab of information from an easier to manage sheet...read about that farther down below.
You can include HTML in the Cue Content, allowing the addition of links to outside materials, images, or whatever you like. See examples below.
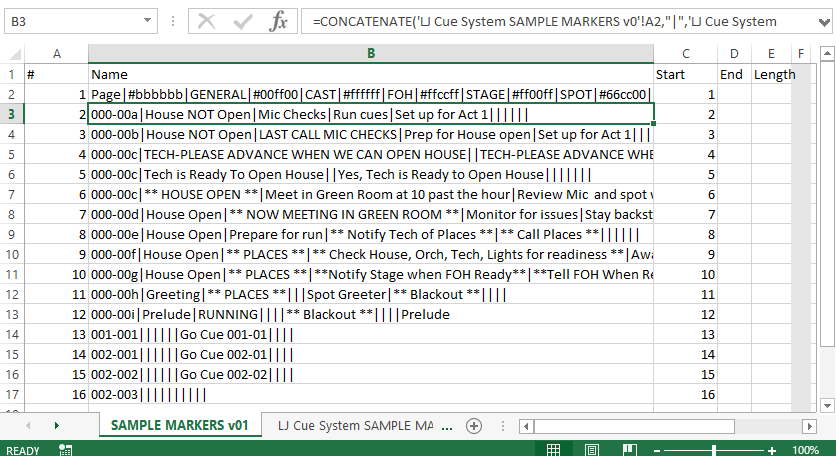
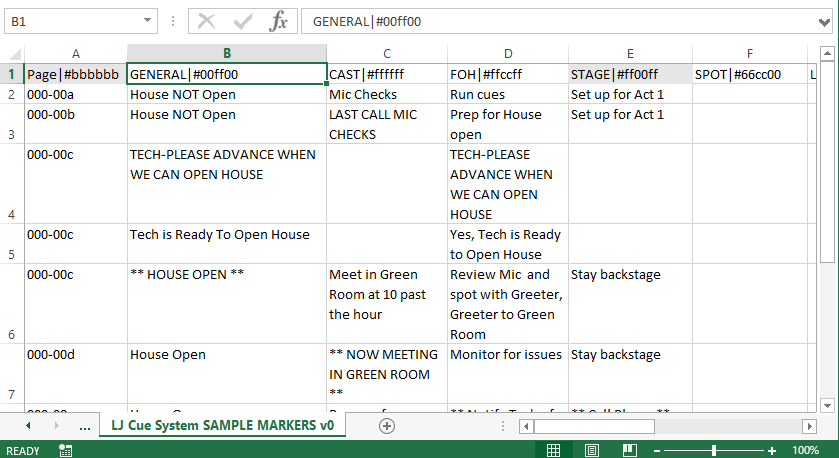
THE FINAL EXPORT contains this information in CSV format with this information, see Figure 1. YOU will likely NOT enter data in this Excel tab but will use the sheet shown farther below and use the included formulas to build this sheet:
Row 1 is a header that must contain exactly these values in sequential columns A through E (because this is how REAPER imports them):
- #
- Name
- Start
- End
- Length
Row 2 is used by these scripts to define your cue table.
Format is:
- Column A: Number (used by REAPER as a Marker Number and must be an integer)
- Column B: Cue Header Content (used by REAPER as a MARKER name)
In COLUMN B, you define each cue label you want in the displayed Cue Table. In this example, I am using a whole lot of labels, more than I probably should. They are PAGE, GENERAL, CAST, FOH, STAGE, SPOT, LIGHTS, AUDIO, VIDEO, SOUND, ORCHESTRA. I use "PAGE" to identify each cue (I used script page number and a sequential number per page...but that's just me). YOU CAN specify your own column(s).
Each cue label name is followed by hex RGB color definition for that label and for the cue contents (do a web search on RGB Color Picker to help you out). The label name and color are separated by a vertical bar (|), and each label is also delimited by a vertical bar.
The format is then: Cue Table Column Name | Color for the prior item
and repeat those in pairs separated by a vertical bar.
- Column C: Unique Number - determined order of cues ... they will be sequenced by this number (used by REAPER as a MARKER position). This must be an INTEGER. NOTE: REAPER timeline may need to be set to reflect SECONDS for this to import properly.
- Column D is blank
- Column E is blank
Rows 3 onward are used by these scripts to specify your cue table content.
Format is:
- Column A: Number (used by REAPER as a Marker Number and must be an integer)
- Column B: Cue Content (used by REAPER as a MARKER name)
In COLUMN B, you define each cue content to display for each cue name you specified in Row 2. Separate these by vertical bars. Include content or a blank foir each cue name you set in Row 2.
The format is then: Cue Table Column Content|Cue Table Column Content ... repeated for each cue name
and repeat those in pairs separated by a vertical bar.
- Column C: Unique Number - determined order of cues ... they will be sequenced by this number (used by REAPER as a MARKER position). This must be an INTEGER. NOTE: REAPER timeline may need to be set to reflect SECONDS for this to import properly.
- Column D is blank
- Column E is blank
TO MAKE THIS EASY, as shown in Figure 2..in the example provided in the downloads, this view is actually just a bunch of formulas that pull information from the 2nd sheet. If you build your content in the 2nd sheet, and then copy rows of the first sheet to match the number of cues you have, all will be formatted for you.
This second sheet just has one row of Cue information for each Cue you want. The first row is a Cue Name and bar and Color. Subsequent rows are the cue content for each cue name, each in its own column to match the names. Easy!
You can include HTML in the cue information to provide links to other information or to display images, for example, as well as giving you the ability to change font or color for specific content.
For example, if you place something like this in a cell, you get a link to an outside source of information such as a web page or Google Document (note it is best to specify color as defaults often do not provide readability):
<a style= "color:#ffffff;" href="http://www.cmpshows.org" target="_blank">See Web Page</a>
To add an image, include somethign like this:
<img src="https://cmstl.org/wp-content/uploads/2019/01/Oklahoma-Poster-2019-v10-smallest-232x300.jpg" height="80">
Getting The Cue Information into REAPER
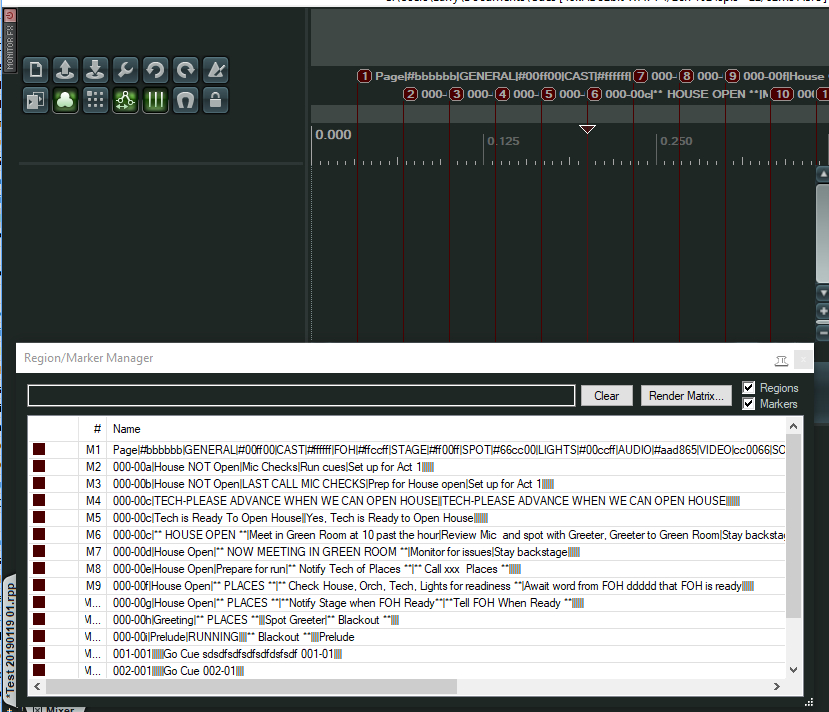
To Put this into REAPER, first EXPORT the first Tab as CSV. Then go to REAPER and right click in the timeline area and be sure to select SECONDS near the bottom of the dropdown defining timeline increments.
Then click VIEW in the menu and click "Region/Marker Manager". Right click in the table and Import.
NOTE: If you import new markers to REAPER or Edit a Marker in REAPER or add a MARKER or DELETE or MOVE a MARKER in REAPER it will appear for all users upon the next change in timeline position in REAPER. You can navigate directly in REAPER or in the Scripts I am providing in this package.
INSTALLING THE HTML FILES and Accessing them
The provided HTML files need to be placed properly on the PC on which you are running REAPER and need to get configured.
See Chapter 17 in the REAPER manual for some details. It is titled Controlling REAPER with a Web Browser Interface.
On a PC, the HTML files go to C;/users/name/ AppData/Roaming/REAPER/reaper_www_root
I do not have a Mac to validate installation there.
To enable the HTML in REAPER, go to Preferences ->Controls.OSC/web- and ADD.
Use Web browser interface as the control surface selection, pick a port, optionally add a userid and password for script access, use the down arrow to select the LJ... script to assign to the desired port and off you go.
I recommend a static IP for your REAPER PC so these do not change....and a separate ROUTER to control access at shows.
In Windows, you also need to open the port for the network type (private hopefully) involved so that desired users can get to the script via the specified port.
REVISION HISTORY and CONTACT INFORMATION
January 23, 2019 - v02.02 of the scripts is in place. This refreshes the top table only if there was a change in cue. Also, it now only displays as may row entries as there are header entries.
January 22, 2019 - Initial release of all items.
Contact: Larry@WorkWebs.com
